Sunday, April 17, 2011

Coming soon

So I made a lovely beret about a month ago, but I realize that hat season is ending pretty much. It was warm enough here in New York today for my brother and I to go out and buy some lemon ices. But I knitted that thing blindly without really writing down what I was doing. I'm in the process of making another one keeping track of everything. But here is what it looks like:


I'll finish that up as soon as possible. I'm also working on a giant tote bag, which is going pretty well so far. I'll update with pics of that soon. This hat will be up by the end of the week...promise!

Tuesday, April 12, 2011

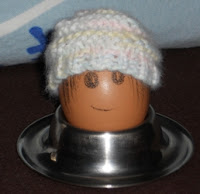
Easter Fun: Egg-Warmers!


Here's the link to the PDF if you wish.

EGG-cessories!


You’ll love these absolutely adorable easter egg decorations that can also be used year round as egg warmers.
They’re versatile, colorful, and very easy to make. All three can be completed in less than an hour!


Supplies
 A set of size 5 double pointed needles
 Bernat Softee Baby Yarn—1 skein
 Stitch marker
 Tapestry needle/crochet hook

GAUGE
#1 - 6 stitches x 8 rows = 1 square inch in stockinette stitch (right side)
#2 - 6 stitches x 8 rows = 1 square inch in alternating 2 knit and 2 purl rows.
#3 - 6 stitches x 8 rows = 1 square inch in 2x2 ribbing.

Hat #1—
Cast on 32 stitches.
Split stitches between needles and ioin row. Place stitch marker.
Knit all for 9 rows.
10—K6, K2T
11—K5, K2T
12—K4,K2T
13—K2T, K1, K2T
14—K2T, K1
15—K2T
Cut yarn and pull through remaining stitches.


Hat #2—
Cast on 28 stitches.
Split stitches between (preferably 4) needles and join row.
Place stitch marker.
K1 P1 for 3 rows.
4—K1, INC 1, K6  x4 = 32 st total
5—K
6, 7— P
8, 9— K
10, 11—P
12, 13—K
14—P2, P2T
15—P1, P2T
16, 17—K2T
Cut yarn and pull through remaining stitches.
*Hint - if this looks a bit squarish, flip the hat inside out.


Hat #3—
Cast on 32 stitches.
Split stitches between needles and join row.
K2P2 for 18 rows.
Cut yarn and pull through stitches


And that's it! Enjoy!


Stitch Markers

I know that everyone has their own way of making stitch markers. Some just use a piece of yarn, and others may buy some along with other knitting supplies. My method is a bit different, but it provides me with dozens of stitch markers, and it doesn't take a lot of supplies.


What you will need:
A sheet of paper, a roll of packaging tape, scissors, and a hole puncher.

Directions:
On one section of the paper, layer both the front and back with packaging tape.
Cut this out from the rest of the sheet of paper. Send it through the hole puncher and leave about 1 centimeter in between each new hole.

Now, cut them up.


Now you should have a bunch  of squares with holes. Trim these squares down individually to the width you need.


And this is what the finished product looks like! If you're disorganized like me and lose stitch markers all over the place, this is a great method to make sure you'll always have enough. It's cheap, fast, and doesn't require any supplies besides what you probably already have at home.

Rim of a Hat


Again, I point out that I know this isn't the only method to do these things, but this is one thing that always works for me.
Often when you knit a hat, you find that you will need to double up on the rim and sew elastic into it. I've noticed that especially with thicker yarn, the rim will look extremely chunky compared to the rest of the hat. This is how I minimize that effect for a lovely hat that won't stretch out and fly away in the next wind.

Edit: I should point out that with experimentation, I've found that this works best with lighter yarns, worsted or lighter. When done with chunkier yarns this can make the shape of a the hat a little...odd? Not sure how else to describe it but it's something to consider.

So this is how I do it:
Let's say for argument's sake, your pattern calls for you to knit 8 rows of K2 P2 rib, like this:


Like this. Simple enough. After you are done with that, PURL one entire row. This will make the inner part of the rim that you intend to sew in fold inwards.
Then, begin the ribbing in reverse. So for example, if you did K2 P2, now do P2 K2 for the same amount of rows you did for the first section, like this:


Then you make the hat according to the rest of the pattern. Once you're done, FOLD the first part of the rim into the second and use either leftover yarn or thread with a tapestry needle to sew it together. You can place elastic inside too to make the hat a more snug fit.

Enjoy!

Men's Basketweave Beanie


"Zwei links, zwei rechts, zwei fallen lassen."
Just a cute name for this hat. When I first started seriously knitting, my mother would tell me that. It means "Two left, two right, drop two" in German. For simplicity purposes we shall call this hat "Men's Basketweave Beanie."


Materials
Yarn: Patons Classic Wool in Gray (about 1/2 skein)
Needles: US Size #8 (5mm) circular 16 inch needle and a set of Double Point needles
Crochet hook or tapestry/yarn needle

Pattern
Cast on 80 stitches.
Join row.
Rim: (ROWS 1 THROUGH 8 ARE OPTIONAL, IF YOU WANT TO MAKE A FOLDED RIM FOR THE HAT)
1 - K2 P6, repeat 9 more times.
2 - K all.
3 - K2 P6, repeat 9 more times.
4 - K all.
5 - K2 P6, repeat 9 more times.
6 - K all.
7 - K2 P6, repeat 9 more times.
8 - P all.
9 - K2 P6, repeat 9 more times.
10 - K all.
11 - K2 P6, repeat 9 more times.
12 - K all.
13 - K2 P6, repeat 9 more times.
14 - K all.
15 - K2 P6, repeat 9 more times.

Increasing:
16 - K8, increase 1 by knitting into the stitch below, 10 times total.
(Total increase = 10 stitches = 90 total.)
17-22 - K2, P1, K5, P1; 10 times per round. (6 rounds total)
23-28 - K2 P7; 10 times per row. (6 rounds total)
29-34 - K2, P1, K5, P1; 10 times per round. (6 rounds total)
35-40 - K2 P7; 10 times per row. (6 rounds total)
41-46 - K2, P1, K5, P1; 10 times per round. (6 rounds total)
Begin decrease:
47 - K2, P7, and repeat 10 times per round.
48 - K2, P3, P2T, P2 and repeat 10 times per round. (80 stitches remaining)
49 - K2, P6, and repeat 10 times per round.
50 - K2, P2, P2T, P2, and repeat 10 times per round. (70 stitches remaining)
51 - K2, P5, and repeat 10 times per round.
52 - K2, P5, and repeat 10 times;
53 - K2, P1, K3, P1, and repeat 10 times.
54 - K2, P1, K2T, K1, P1, and repeat 10 times. (60 stitches remaining)
55 - K2, P1, K2, P1, and repeat 10 times.
56 - K2, P1, K2T, P1, and repeat 10 times. (50 stitches remaining)
57 - K2, P1, K1, P1, and repeat 10 times.
58 - K2, P1, K1, P1, and repeat 10 times;
59 - K2, P2T, P1, and repeat 10 times. (40 stitches remaining)
60 - K2, P2T, and repeat 10 times. (30 stitches remaining)
61 - K1, K2T, and repeat 10 times. (20 stitches remaining)
62 - K2T and repeat 10 times.
10 stitches remain. Cut your yarn and use tapestry needle/crochet hook to pull it through the loops and close off the hat.

You will notice that the rim of the hat folds halfway inward. Fold the whole thing together, and stitch it up, making a double reinforced rim. You can add elastic if you wish.

And, you're done! 

Geometric Beanie


This is a project idea I got from a beanie I had a while back. It looks completely different, but functions just the same - - it's large, covers my ears, and looks really cool! It's very stretchy because of the variation in stitches, but if necessary I added a large size in parenthesis.


What you will need:
1 skein of worsted weight wool. I used Loops & Threads Impeccable yarn in Luxury Ombre. (I would strongly recommend a tricolor yarn otherwise the pattern doesn't come out nearly the same.)
1 set of US Size 8 16" circular needles
1 set of US Size 8 double pointed needles

GAUGE
4 stitches and 5 rows = 1 square inch in stockinette stitch.

Pattern:
Loosely cast on 80 (84) stitches.
Join row and place stitch marker.
Row 1-5: K1 P1 & repeat for entire row. This will be sewn in later for the rim. (5 rows total)
Row 6: Purl entire row. This makes the first 5 stitches fold inwards, making it easier to sew together.
Row 7-11: P1 K1 & repeat for entire row. (5 rows total)
Row 12-16:  Purl entire row. (5 rows total)
Row 17-22: Knit entire row. (6 rows total, 7 for large sized)
Row 23-27: Purl entire row. (5 rows total)
Row 28-33:  K3 P1 & repeat for entire row. (6 rows total, 7 for large sized)
Row 34-38: Purl entire row. (5 rows total)
Row 39: K18 (19), K2TG around & repeat for entire row, decreasing 4 stitches per row.
Row 40: K17 (18), K2TG around.
Row 41: K16 (17), K2TG around.
Row 42: K15 (16), K2TG around.
Row 43: K14 (15), K2TG around.
Row 44: P13 (14), P2TG around, decreasing 4 stitches per row.
Row 45: P12 (13), P2TG around.
Row 46: P11 (12), P2TG around.
Row 47: P10 (11), P2TG around.
Row 48: P9 (10), P2TG around.
Row 49: (for large sized only!!!)  P9, P2TG around.
!At this point, both large and normal sized are even. 
Row 50: K3, K2TG around.
Row 51: P2, P2TG around.
Row 52: K1, K2TG around.
Row 52: K2TG around.
Row 53: There should be 8 stitches left. Cut the yarn with a foot to spare and pull that through the remaining stitches with a yarn or crochet needle.

Now you'll notice that the first 5 rows fold slightly into the hat. Fold them all the way in and use a yarn or crochet needle to sew that into the next five, creating the rim of the hat.  This can be done very easily, using the extra yarn from the beginning of the hat and adding more if necessary.
 And you are done!

Chunky Starfish Beret Pattern

I love this beret. It's made with a baby yarn so it's nice and soft, and it's knitted in seed stitch which makes it a puffy adorable hat. I started with a star and decided in the end that a starfish was way cuter.


What you will need:
1 set of US Size 8 16" circular needles
1 set of US Size 8 double pointed needles
1 cable needle. If you do not have one, you can use one of your double pointed needles. 
1 set of US Size 5 circular needles is also preferred but not necessary
1 crochet hook or yarn needle 
1 skein of light and soft baby yarn. I used Loops & Threads Snuggly Wuggly Mini Dots.


GAUGE
5 stitches x 8 rows = 1 square inch in seed stitch.

Pattern: 
Cast on 75 stitches onto Size 5 needle if you are using it. (Smaller needles makes the rim fit more snugly on your head)
Join the row and place a stitch marker at the beginning. 
K1 P2 and repeat for 8 rows. (If you wish to fold it over for a rim to add elastic, add 1 all purl row and then K1 P2 for 8 more rows.)
Row 1: K4, Double each of the next 11 stitches by knitting under the previous stitch, making that 22 stitches. Repeat 5 times.
*Knit onto the Size 8 needle this row:
Row 2: K4, Purl 22 and repeat. (Repeat will be 4 more times, 5 times total.)
Row 3: K4, P1 K1 for 22 stitches, and repeat.
Row 4: K4, K1 P1 for 22 stitches, and repeat. (Alternating each segment with K and P creates seed stitch.)
Row 5: K4CNF*, P1 K1  for 22 stitches, and repeat.
Row 6: K4, K1 P1 for 22 stitches, and repeat.
Row 7: K4, P1 K1 for 22 stitches, and repeat.
Row 8: Same as row 6.
Row 9: Same as row 7.
Row 10: K4CNF, K1 P1 for 22 stitches and repeat.
Row 11: Same as row 7.
Row 12: Same as row 6.
Row 13: Same as row 7.
Row 14: Same as row 6.
Row 15: Same as row 5. 
Row 16: Same as row 6.
Row 17: Same as row 7.
Row 18: Same as row 6.
Row 19: Same as row 7.
Row 20: Same as row 10.
Row 21: K4, P2T, K2T, continue segment as normally, repeat.(Resume the pattern P1 K1 for 18 more stitches)
Row 22: K4, K1 P1 for 20 stitches, and repeat.
Row 23: K4, P1 K1 for 20 stitches, and repeat.
Row 24: Same as row 22.
Row 25: K4CNF, P2T, K2T, continue segment as normally (16 more stitches), repeat.
Row 26: K4, K1 P1 for 18 stitches, and repeat.
Row 27: K4, P1 K1 for 18 stitches, and repeat.
Row 28: Same as row 26. 
Row 29: K4, P2T, K2T, continue segment as normally (14 more stitches), repeat.
Row 30: K4CNF, K1 P1 for 16 stitches, and repeat.
Row 31: K4, P1 K1 for 16 stitches, and repeat.
Row 32: K4, K2T, P2T, continue segment as normally (12 more stitches), repeat.
Row 33: K4, P1 K1 for 14 stitches, and repeat.
Row 34: K4, K1 P1 for 14 stitches, and repeat.
Row 35: K4CNF, P2T, K2T, continue segment as normally (10 more stitches), repeat.
Row 36: K4, K1 P1 for 12 stitches, and repeat.
Row 37: K4, P1 K1 for 12 stitches, and repeat.
Row 38: K4, K2T, P2T, continue segment as normally (8 more stitches), repeat.
Row 39: K4, P1 K1 for 10 stitches, and repeat.
Row 40: K4CNF, K1 P1 for 10 stitches, and repeat.
Row 41: K4, P2T, K2T, continue segment as normally (6 more stitches), repeat.
Row 42: K4, K1 P1 for 8 stitches, and repeat.
Row 43: K4, P2T, K2T, continue segment as normally (4 more stitches), repeat.
Row 44: K4, K1 P1 for 6 stitches, repeat.
Row 45: K4CNF, P2T, K2T, continue segment as normally (2 more stitches), repeat.
Row 46: K4, K1 P1 for 4 stitches, repeat.
Row 47: K4, P2T, K2T, repeat.
Row 48: K4, K2T, repeat.
Row 49: K3, K2T, repeat.
Row 50: Cut the string about 18 inches from the needle, then thread this string using either a crochet hook or yarn needle through the remaining 20 stitches. Bring the string to the inside and pull tight, then close it off well with a knot or two. 
If you created a rim, size some elastic and sew it together using the crochet hook/needle.

And you are done! 


*K4CNF - Using the four knitted stitches, slip the first two stitches on a cable needle (or double pointed needle). Keep the needle with the stitches in front of your circular needles. Knit the next two stitches on the circular needles, then knit the two stitches on the cable needle. And you have a cable!